NOTE: This only works in Macs.
God knows, I need to be held by the hand half the time…just think of your poor clients…! Senda Shallow took me by the hand and led me through this process. Now, it’s my turn to help you out.
In this tutorial, we’ll go step-by-step to create a DMG file to make it way too easy for your clients to install their new, customized email templates.
|

Figure 1. First step in creating your DMG file is to create a “New Image”. |
|
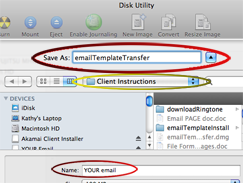
Figure 2. Displays the initial steps in for a DMG file: saving it (naming the DMG file), where to save the file, and creating the drive (Name). |
|
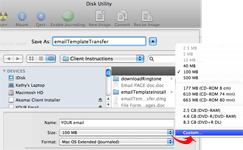
Figure 3. |
|

Figure 4. Cheating Disk Utility into a tiny emailable size. |
|

Figure 5. Well, turns out Disk Utility is onto us but it’s willing to concede to a much smaller image size. |
|
Create an Alias Folder in Apple’s Mail
Creating the email template is confusing enough. I cannot imagine the instructions it would require and the exchange of phone conversations that would be needed to help your client install his/her email template. The DMG package — with alias — makes this installation fool-proof.
The key is making an “alias” of the exact folder where the template is to be installed. In this particular case, I want to my client to install this template inside the “Stationery” folder.
|

Figure 6. You want the Resources folder which appears AFTER you’ve chosen the template category. |
|
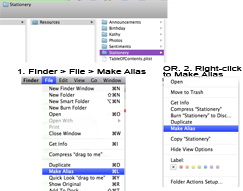
Figure 7. Two different ways to create an alias: the long way and the shortcut. |
|

Figure 8. Creating the “drag to me” alias with the Resources folder is what sets up the fool-proof transfer of getting the customized email template into the desired email stationery category. |
Set Up DMG Package
Once you’ve created your custom email template and the alias folder, you need to package it up so you can email it to your client.
|
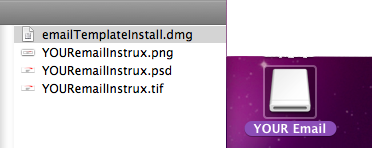
Figure 9. Double-clicking “emailTemplateInstall.dmg” (left) results in |
|
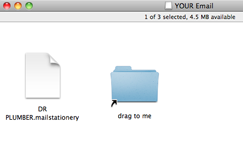
Figure 10. The unadorned DMG package with the new email template and its alias. |
Of course, I might not understand just what it is I’m supposed to do with this
Extra: Make it so visually obvious…
Make it so visually obvious that your client can’t help but install it correctly.
|

Figure 11. This just doesn’t give enough of a hint. |
|
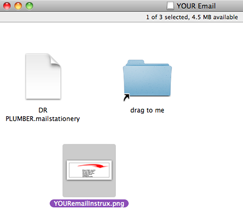
Figure 12. Okay, I’ve dragged the file of the visual information onto the DMG package…why isn’t the picture showing up? |
|
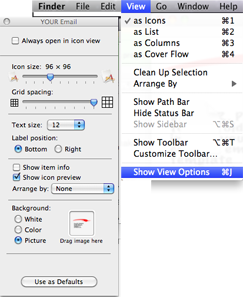
Figure 13. You have the option of adding a visual aid. |
|
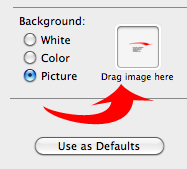
Figure 14. With |
|
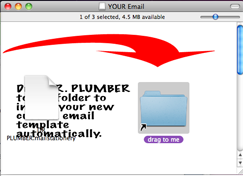
Figure 15. Oops… |
|
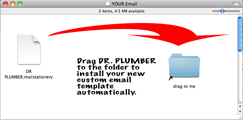
Figure 16. The finished DMG package. |
Assemble the Client’s Package
- Find email
- Click through
Finder > Macintosh HD > Library > App Support > Apple > Mail > Stationery > Apple > Contents > Resources > Custom > Contents > Resources > Your Client.mailstationery - With
Your Client.mailstationeryselected, drag it onto the openYOUR Emailwindow
Send the Email Template
- Drag the .dmg file from Finder into the New Message OR onto the Mail icon in your dock bar
Troubleshooting:
I dragged the DMG package into my email message but there’s nothing there when I click on it.
Be sure that you have dragged the emailTemplateInstall.dmg and not the YOUR Email icon.
When I click on the YOURemailInstrux, the DMG package window doesn’t open.
It’s not the DMG package. You must:
- Click the
emailTemplateInstall.dmgfile- This opens
YOUR Emailon your desktop
- This opens
- Double-click this
YOUR Emailicon
My background picture doesn’t appear when my client opens the DMG attachment.
- You must drag the file from your hard drive into the DMG package window first
- Right-click on the package window
- Choose
Background > Picture - Drag the picture icon INSIDE the DMG window onto the small square to the right of “White, Color, Picture”
- The package window acts like a flash drive. It only shows what’s actually installed on it. By dragging the image file from your computer, the information about the picture does not follow with the package. You must “install” the picture on the DMG package for it to be displayed.

