This tutorial focuses on Mac for Word 2004. The principle is the same for any PC version.
[do_widget id=custom_html-11 title=false widget_classes=none]Microsoft’s Word has a very useful tool for authors and their editors/proofreaders/copyeditors — the Markup tool. It allows any number of people to edit or make comments on a Word file without irrevocably changing the file itself.
You can ask questions, make statements. Change the formatting. Anything at all without changing the original document at all.
Word allows you to view the original file without any changes whatsoever or choose to see the final document with all its changes as it retains all the versions within the one file.
To See Markups
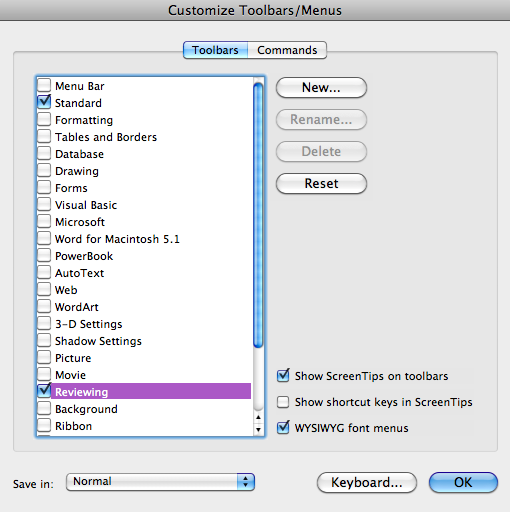
Figure 1. Choose “Reviewing” to open the Markup toolbar.
Using Markup requires a special toolbar so comments can be viewed, made, or accepted/rejected.
- Open the Markup tool bar by selecting:
Tools>Customize>Customize Toolbars/Menus…- Select the
Reviewingcheckbox OK
- Open the Word file you want to mark up
- Select
Track Changeson the Markup toolbar, see Figure 2

Figure 2. “Track Changes” on the Markup toolbar must be selected (a darker background than the rest of the icons on that toolbar) in order for you to view the balloons.
- If edit or comment balloons do not show in the right margin of the document (see Figure 3), then Track Changes is not selected

Figure 3. A Word file with Markup turned on and displaying two comment balloons. The upper tag is an explanation of the change. The lower tag is the edited text. A “checkmark” and an “x” provides the author the option to accept or reject the edit.
Tweaking Markup
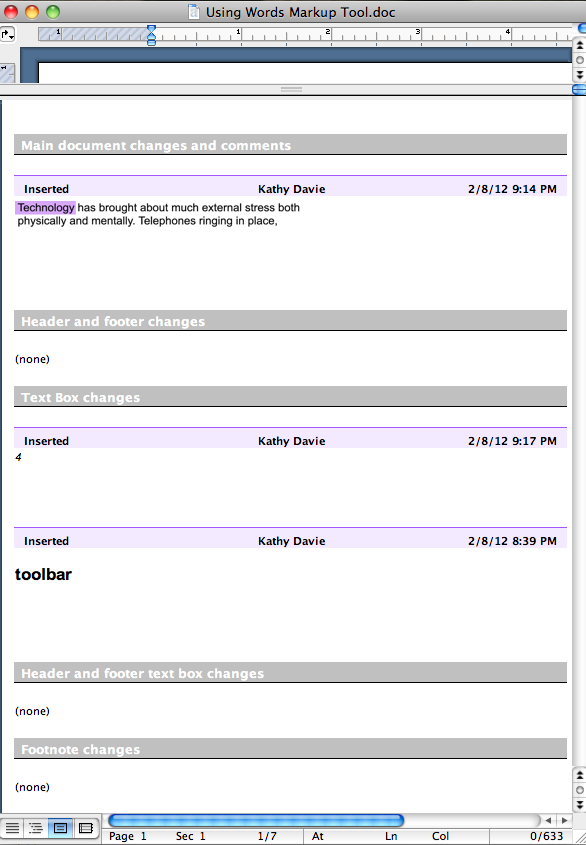
Figure 4. You can adjust the actual height of the Reviewing Pane window. This example simply shows the different sections of a document into which Word divides the changes.
You have control over which comment balloons are displayed on the page through Show — selecting Comments, Insertions and Deletions, and/or Formatting will determine if that balloon tag is visible in the document.
Reviewers provides a list of all the people using Markups on this document.
Reviewing Pane is a drop-down at the bottom of the document that displays the comments in a larger text form.
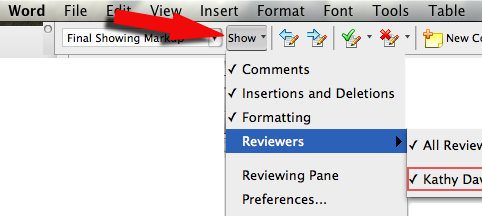
Figure 5. Further customize your Markup by selecting (or deselecting!) “Comments”, “Insertions and Deletions”, and “Formatting”. They are all comment tags that appear as balloons on the right.
At the top, the Reviewing Pane begins with “Main document changes and comments” followed by “Header and footer changes”, then “Text box changes”, “Header and footer text box changes”, and finally “Footnote changes”.
Preferences allows you to customize how you see the markups in the document. The colors used, whether the change is highlighted in a color, with lines, in bold, etc. Ideally, the author should set these preferences.
You may also choose as to the color used by your particular comment balloons.
For more detail, view Preferences at the end of this document.
Anatomy of a Comment Balloon
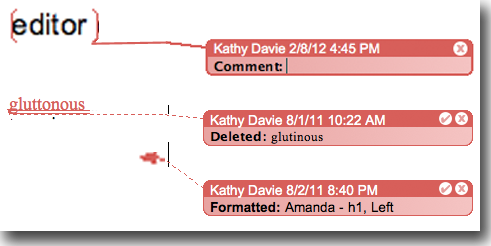
Figure 6. Displays a comment and edit tag as well as the line indicator pointing to the text that is affected. I did blow up the size of “editor” and the arrow-shaped blob for Formatting so you could actually see the markers.
The top tag is for typing in Comments.
The middle tag is Insertions and Deletions, a reminder as to what text, punctuation, line break, or empty space used to be there.
The bottom tag marks Formatting changes.
All three balloon tags in Figure 6 provide the name of the person making the comment as well as the date and time the comment/edit was made.
All three balloon tags in Figure 6 provide include action buttons — a “delete” option ![]() which rejects the change.
which rejects the change.
The middle and bottom balloon tags in Figure 6 provide include a “checkmark” option ![]() which indicates acceptance of the change.
which indicates acceptance of the change.
Using Markup
Ask a Question / Explain

Figure 7. “Technology” is the selected text. After clicking “New Comment”, the green bubble is inserted on the right (in Preferences, Figure 1, you can change the color of your comment bubble).
Inserting a comment allows you to ask a question or make an explanation:
1. Select the desired text

Figure 8. The “New Comment” icon is in the Markup toolbar.
2. Click on New Comment (in the toolbar)
- A cursor will appear to the right of the
Comment:

Figure 9. A comment balloon tag allows you to type in a question or response, well, actually, you can type anything you like. A blow-up of the markings Word uses to indicate the selected text is included.
3. You / the editor / a proofreader / a beta reader can type comments or questions or reply to questions inside the comment balloon.
Edit Text

Figure 10. The red text is the edited word. The text replaced is inside the balloon tag preceded by a note that it is “Deleted”.
Any changes made in the text will reflect in a balloon tag.
New Text
Text that is added and does not replace anything does not have a balloon tag.
Accept/Reject Markup
All three balloon tags include action buttons — a “delete” option ![]() which rejects the change.
which rejects the change.
The middle and bottom balloon tags include a “checkmark” option ![]() which indicates acceptance of the change.
which indicates acceptance of the change.
You can also question a “comment” by clicking inside a “Comment” balloon and adding your question or response, or you can also insert your own comment to respond to someone else’s comment.
“Disappear” the Comment Balloons

Figure 11. Markup choices are in the left end of the Markup toolbar (see Table 1 for an explanation of the choices).
Sometimes it is just too irritating to have the balloon tags showing. You can turn them off to edit or read the changed text as though it is a final document through the Markup toolbar.
| Table 1. Explains Track Changes Choices | |||
| “Track Changes” Dropdown Choices (Fig. 11) |
Text That You See | Balloon Tags | What Changes/Markups You See |
|---|---|---|---|
| Final Showing Markup | |||
| Final | |||
| Original Showing Markup | |||
| Original | |||
Authors! Set Your Preferences
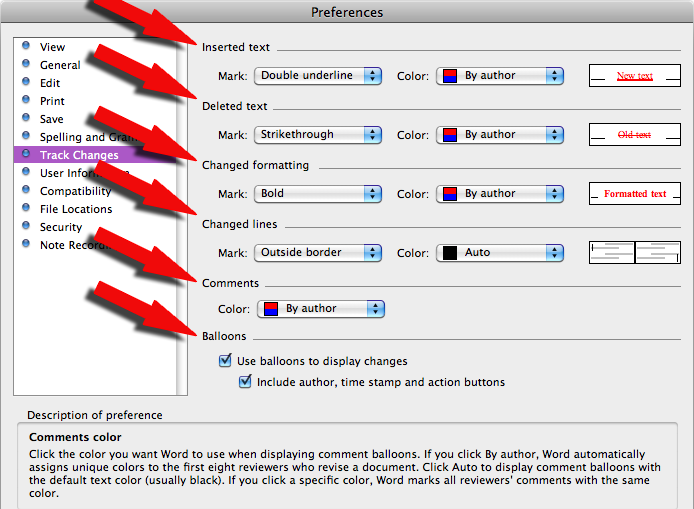
Figure 12. There are six Preference choices: Inserted text, Deleted text, Changed formatting, Changed lines, Comments, and Balloons.
Before sending a manuscript to an editor, set your preferences for how you want corrections or comments to appear by entering Word > Preferences > Track Changes.
- Inserted text – the choices affect text the reviewer inserts
- (none) – no text decoration other than color
- Color only
- Bold
- Italic
- Underline
- Double underline
- Deleted text – the choices affect deleted text (only visible if you choose “Original showing markup”
- (none)
- Color only
- Bold
- Italic
- Underline
- Double underline
- Strikethrough
- Hidden – there is no trace of any deleted text
- ^ – replaces deleted text with a caret
- # – replaces deleted text with a pound sign
- Changed formatting – the choices affect text with formatting changes. Allows you to choose the color of changed formatting.
- (none)
- Color only
- Bold
- Italic
- Underline
- Double underline
- Changed lines – places a vertical line next to a line of text that is changed. You can also choose the color of that line.
- (none)
- Left border
- Right border
- Outside border
- Comments – affects balloon colors
- By author
- Word automatically assigns unique colors to the first eight reviewers who revise a document
- Auto
- Displays comment balloons with the default text color (usually black)
- Choice of 15 colors including several shades of gray, black, and white
- Choosing a color causes Word to mark all reviewers’ comments with the same color.
- By author
- Balloons
- Checking “Use balloons…” causes the colored boxes to appear on the right of the document
- It must be checked to enable “Include author…”
- The color choices you make will affect the color of the comment balloons
It only seems complicated. Once you dive into it and play for a bit, you’ll fall in love with it. It’s so handy for making changes — practical ones, outrageous ones — to ask questions and snark back and forth. It makes it easy to, well, track what’s going on, and it is such a treat to know exactly which chunk of text is being referred to. Even better is being able to go back to the original, unchanged file or click over to the final, beautiful version.
More tools for authors are available at Author Resources with a specific section on Self-Editing
If you found this tutorial useful, I’d love it if you tweeted it to your friends.

